How can you create a Vacuum?
EXPERIMENT I: Creation and measurement of vacuum
What is the goal of this experiment?
We would like to learn how to create vacuum in the laboratory and how to measure vacuum levels. In order to achieve this, we will use a small vacuum pump to create coarse vacuum and a U-tube manometer to measure the drop in the pressure caused by the pump with respect to atmospheric pressure.
What do you need for the experiment?
- wooden ruler
- aspirator
- clear plastic tube of small diameter (3-4 ft) which fits the vacuum line of the aspirator
- any plastic tube (3-4 ft) which fits the discharge line of the aspirator
- laboratory water faucet fitting which connects the inlet line of the aspirator with regular water (garden) hose (depends of the type of aspirator that you have)
- piece of plywood or plexiglas (1 by 2 ft)
- angle or L-shaped bracket
- glue for plastic and wood
- cooking oil
- food color
- 3-4 screws with the nuts and washers
- plastic straps or cable ties
How do you prepare the experiment?
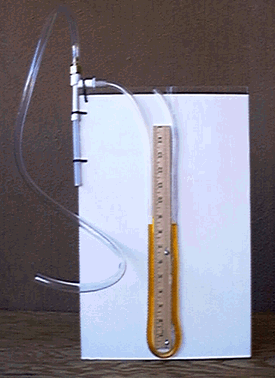
- Take the piece of plywood or Plexiglas and attach it to the angle or L-shaped bracket. You will need to drill 2-3 holes in the plate depending on the kind of bracket you have. Put the screws through the plate and bracket and tighten them. The bracket will hold the plate vertically and a heavier bracket is recommended so that the plate is more stable when you attach the rest of the parts.
- Attach the wooden ruler to the plate on the side opposite from the side where you placed the bracket. You might drill the holes through the ruler corresponding to the holes in the bracket. In that case, you can attach the ruler, plate and the bracket all together.
- Join the pieces given with the aspirator according to the instructions.
- Place the plate vertically and drill one or more holes in the upper left corner of the plate approximately 1 in from the corner.
- Attach the clear tube to the vacuum line of the aspirator.
- Attach the aspirator to the corner of the plate. Use the hole that you drilled to attach the aspirator to the plate using plastic ties. The vacuum line should be horizontally placed, while the discharged line should be vertical going downwards.
- Use glue to attach the clear tube from the aspirator to the plate. Make sure that you glue the tube around the ruler so that you can easily read the distances. The clear tube should go all around the ruler and you should leave the other end open.
- Attach the discharge tube to the discharge line of the aspirator.
- Attach the fitting for the inlet line of aspirator to the garden hose.
- Take cooking oil and mix it with the food color. The colored oil will help you determine the level of the oil column in the manometer.
- Pour the oil through the open end of the clear tube, so that the height of the oil column is around 5-6 inches on both sides of the tube.
- See the photograph of the completed installation in Figure 8.

Figure 8: Photograph of the installation for experiment I (U-tube manometer)
How do you perform the experiment?
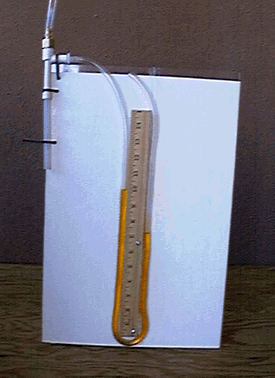
Place the experiment close to the water faucet and connect the water faucet and the inlet of the aspirator by the garden hose. The discharge tube of the aspirator should be placed in a water sink. Write down the level of the oil in the U-tube (it should be the same for both sides). In order to start the vacuum pump, run the water through the water hose. Water will run through the aspirator (vacuum pump) and create the pressure drop in the vacuum line, which will cause the rise of oil level in the side of the U-tube connected to the aspirator (see photograph in Figure 9). Write down the difference between the oil levels. The pressure difference between the atmospheric pressure and pressure created by the pump can be calculated as:
Now, try different flow rates and see how the levels of the oil column change. Write down the difference in levels for different cases of flow rate. Calculate the pressure drop corresponding to the different cases.

Figure 9: Photograph of the
change of oil level with change in pressureI (U-tube manometer)
What are the conclusions?
- The aspirator works as a transfer or a kinetic pump. The mechanically moving part of the pump that we mentioned earlier is actually running water. The water enters the aspirator through the inlet and exits through the discharge line, which has a smaller diameter than the inlet line. The convergence of the cross section area in the aspirator accelerates the fluid, which causes the drop of static pressure in the vacuum line (this effect is known as Bernoulli effect). Now, the atmospheric pressure is larger than the pressure in the vacuum line and thus this pressure pushes the oil up on the side of the U-tube connected to the aspirator.
- The vacuum level (the difference between atmospheric pressure and pressure created by the pump) can be quantitatively determined by the given equation.
EXPERIMENT II: Deformation of material due to creation of vacuum
What is the goal of this experiment?
We mentioned earlier that we would like to study vacuum in order to understand how to design the Space Shuttle to sustain the pressure difference between the cabin and outer space. The goal of this experiment is to demonstrate how deformation of material occurs due to pressure difference.
What do you need for the experiment?
- 60 cc syringe
- Plain plastic (sandwich) bag
- Piece of scotch tape
- 1 or 2 cable ties
How do you prepare the experiment?
- Try the syringe to see how it works. Push the piston all the way inside.
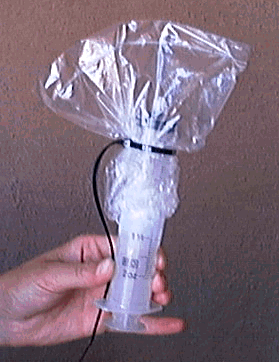
- Take a plastic bag and place the open end around syringe. Make sure to leave some amount of air in the bag, but do not leave too much. Also, make sure that the plastic bag does not have any holes.
- Tighten the plastic bag by cable ties as much as you can and then tape the ends using scotch tape.
- See the photograph of the installation in Figure 9.

Figure 9: Photograph of the
installation for experiment II.
How do you perform the experiment?
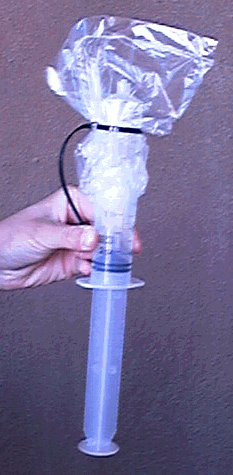
Before you start experiment, observe how much air you left in the plastic bag. Now, move the piston of syringe as far as you can and observe what happens to the plastic bag.
What are the conclusions?
As you move the piston of the syringe, the air from the bag expands to the cylinder of the syringe and the pressure inside the bag drops. Due to the pressure difference between surrounding (atmospheric) pressure and pressure in the bag, the bag is deformed (see photograph in Figure 10). Imagine what would happen if we had a bigger syringe. What would happen with the bag?

Figure 11: Photograph of deformation of plastic bag with change in pressure
Let us proceed with the imaginative experiment. What would happen if we could transfer all the air from an empty soda can using a strong vacuum pump? The can would deform and break, because the material of the can is not strong enough to sustain the pressure difference between the atmosphere and vacuum.
Thus, we must understand these phenomena and apply appropriate design and materials to construct a safe cabin of any space vehicle.
Now click on the practice button on the top of the page to obtain practice and feedback on this lesson.
Page authored by Rajka Krstic, Jennifer Trelewicz and Veena Mahesh
Copyright © 1995-2000 Arizona Board of Regents. All rights reserved.